Thursday, February 24, 2011

Rice Pilaf (aka Rice-A-Roni)

I know what you're saying. Rice-A-Roni? Really Lesley?

Feel free to call it Rice Pilaf if it makes you feel better. That's what I call it when I fix it for someone so that they too aren't turned off (without reason) by the name Rice-A-Roni.

I probably shouldn't be calling it that anyway, I'm sure it's a licensed trademark something or other. So let me say this is, by no means is this meant to be the original Rice-A-Roni brand or lead anyone to believe that it is. No Roni's were harmed in the making of this dish, except the tender one's. (Insert gong here...hello, is this thing on?) You probably only understand that if you are a child of the early 90's & were a Bobby Brown fan.

Rice Pilaf, aka Rice-A-Roni, the southern Alabama treat used to be one of my favorite things my Grandma fixed. She was the only person that would fix it & she usually did this because she knew I liked it so much. My sweet Grandma was a jewel & I miss her terribly. I also miss Rice-A-Roni which is one of the reasons why I came up with this recipe. The other reason is because I try to stay away from boxed, semi-prepared food. From scratch can be just as easy & taste much better.

So here we go.

Pour a little canola oil & a healthy tablespoon of butter into a pan over medium-high heat.


Chop a medium-sized onion & add to the butter & oil.

Saute onion until it's just transluscent & almost done.

Throw in a cup of Arborio rice & a cup of broken up vermicelli. Arborio works really well for this recipe. It has a great texture & flavor & can be found with the long grain rice in any grocery store. For the vermicelli I literally broke it up into 1/4-1/2 inch pieces. It didn't take as long as it sounds like it would & trying to cut it with a knife or kitchen shears doesn't work & makes a mess. Just bite the bullet & start breaking.

You're going to saute the rice & pasta for about 8 minutes or until the vermicelli starts turning slightly golden brown. Some pieces may get more brown, that's okay it will taste just as good. The longer you saute it the less likely it will get starchy when you add the liquid to simmer it.

Now add about 2 cups of chicken broth & stir well. Cover this, reduce your heat & let this simmer for 20 minutes. I start with 2 cups & often times have to add more until the rice & pasta are done.

While your rice is simmering grab some italian parsley or flat-leaf parsley. Italian parsley has a ton more flavor than regular parsley & gives anything you add it to alot of fresh herby (is that a word?) flavor.

Give the parsley a rough chop.

Check your rice & pasta, it should be done but not sticky. If it's not to your desired doneness but the liquid is absorbed add a little more broth, cover & simmer a little longer. Be sure to keep an eye on it, again it should not be sticky or starchy but done.

Add your parsley & stir well. This is where I realized I did not take a picture of it after I stirred it up.

Just imagine this same picture but with the rice pilaf aka rice-a-roni mixed up. Mmmm, doesn't it look delicious?

So now you get the finished product where I garnished it with more parsley.


This makes a great side dish for almost anything. Hope you enjoy!

Rice Pilaf

1 Tbsp canola oil
1 Tbsp butter
1 med. onion, diced
1 cup of arborio rice
1 cup of vermicelli broken into 1/4-1/2 inch pieces
2-3 cups of chicken broth
1/4 cup fresh chopped italian parsley

Heat oil & butter in a skillet over medium-high heat. Once butter has melted add onion & cook until transculcent. Add rice & pasta. Saute until pasta becomes golden brown, continuously stirring. Add broth, stir, reduce heat, cover & simmer for about 20 minutes. If broth is absorbed before rice & pasta is done, simply add more broth, re-cover & continue simmering. After your rice pilaf is done toss in your chopped parsley, mix well & serve immediatley.

Note: You can saute mushrooms and/or green peppers with your onion to add a different flavor. You may also substitute beef broth or vegetable broth if it compliments the rest of your meal better.

Friday, February 18, 2011

Beef & Bean Burrito Enchiladas

I love Mexican food!!

I do...& I don't care who knows. I'll scream it from the rooftops!

I LOOOOVE MEXICAN FOOOOOD!!

See...that's me, screaming from rooftops.

I'm sure most people would agree with me because I haven't met many people that do not enjoy meat & cheese rolled up in a tortilla. Mexican food is mostly some version of that right? I know for a fact everyone likes cheese dip & tortilla chips. If you don't, I don't think this relationship between you & I is going to work out. That's just crazy talk, not liking cheese dip, pssshhhh!

Anyway, cheese dip does not have a single thing to do with this recipe. I kind of got off on a tangent.

Back to the task at hand.

Burritos! Not just any burritos, burrito enchiladas. Why the two names you ask? It's pretty simple, they are just burritos covered in enchilada sauce & they are delicious.

And here's how ya make 'em...

Use about 1lb of ground beef, I used ground chuck, it has a better fat to meat ratio & cooks up really flavorful. Also, we have green onions, taco seasoning, shredded cheese (I used the mexican blend), enchilada sauce, refried beans, black olives, diced tomatoes with green chilis or rotel tomatoes as they are most often called & of course, flour tortillas. This will make eight burritos, I only made five stuffed to the gills burritos & still had plenty left over to make a few more. I would suggest going a little easier on the meat filling if you plan to make the eight.

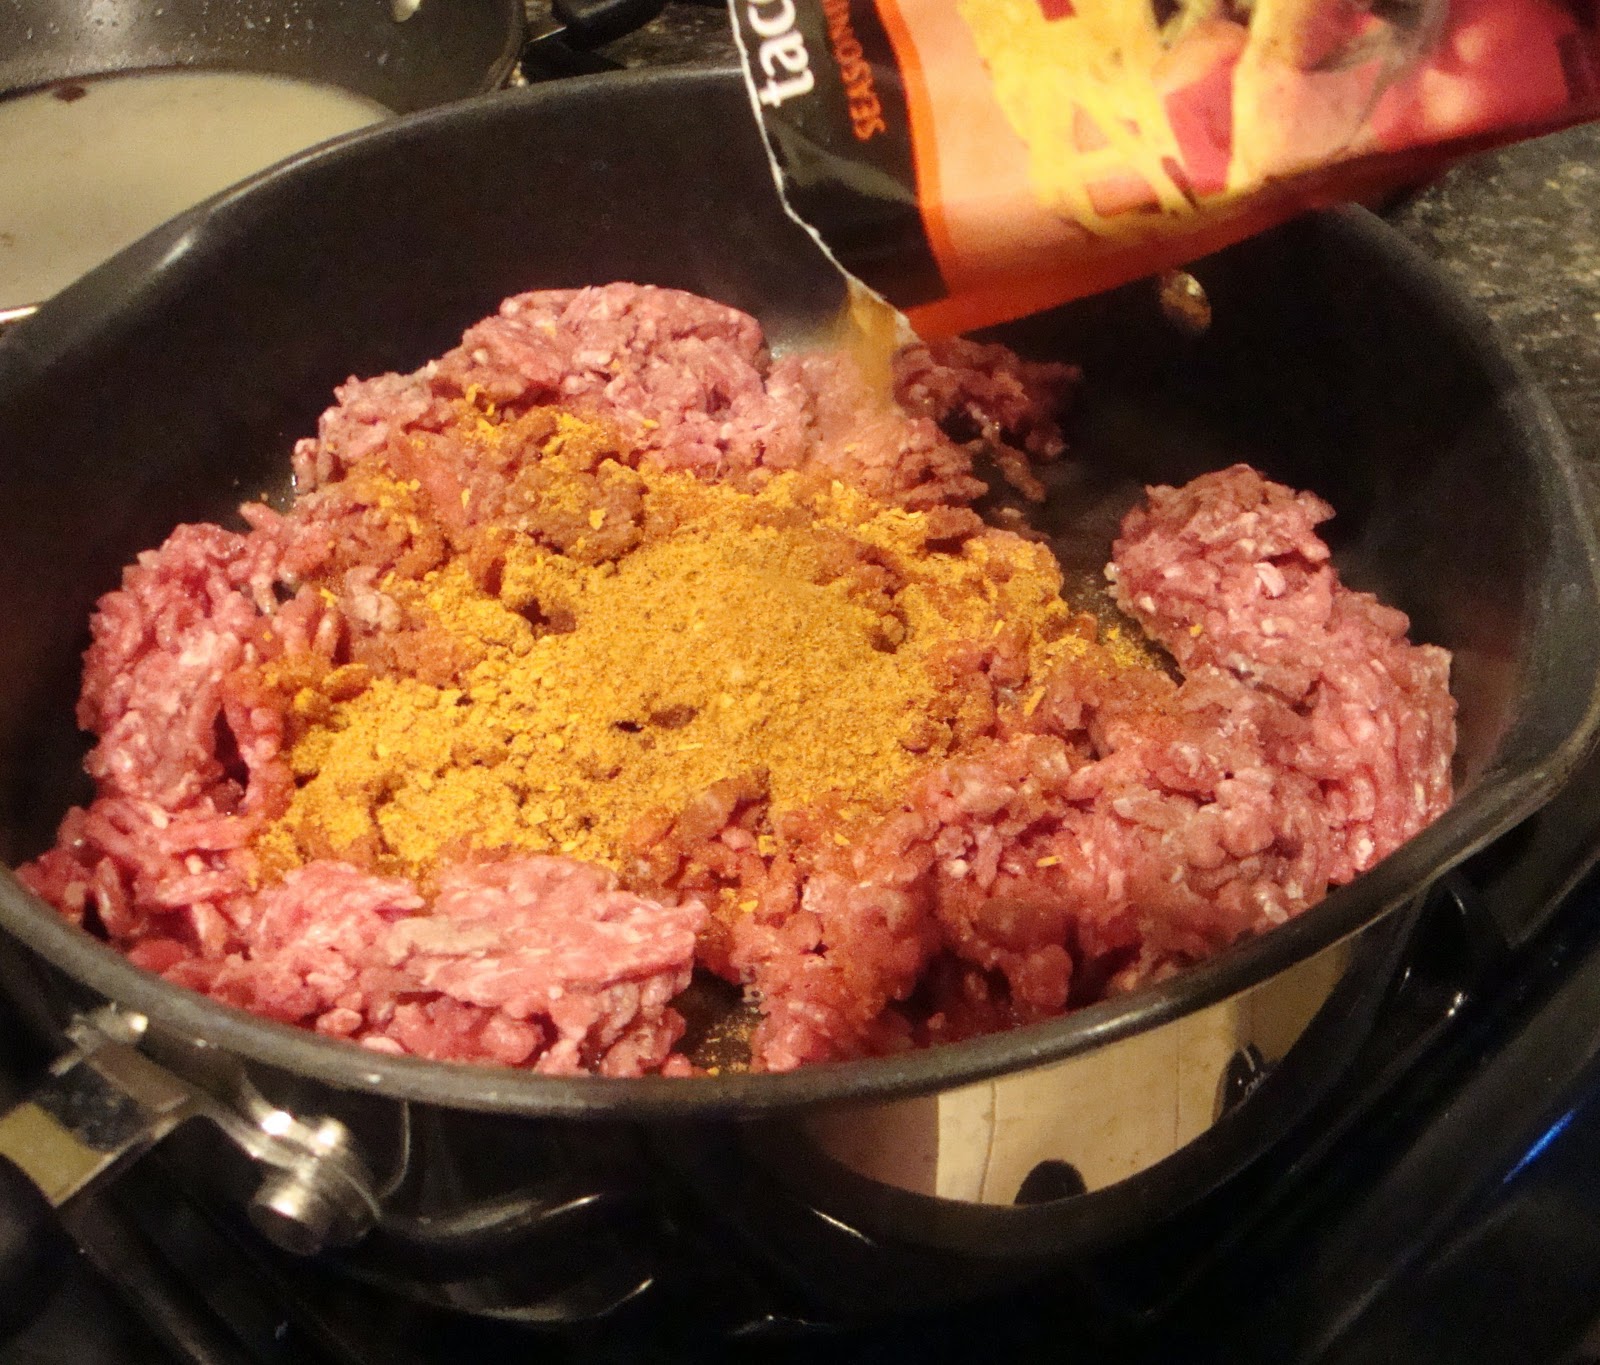
Place your ground beef in a skillet over medium-high heat & add the taco seasoning...


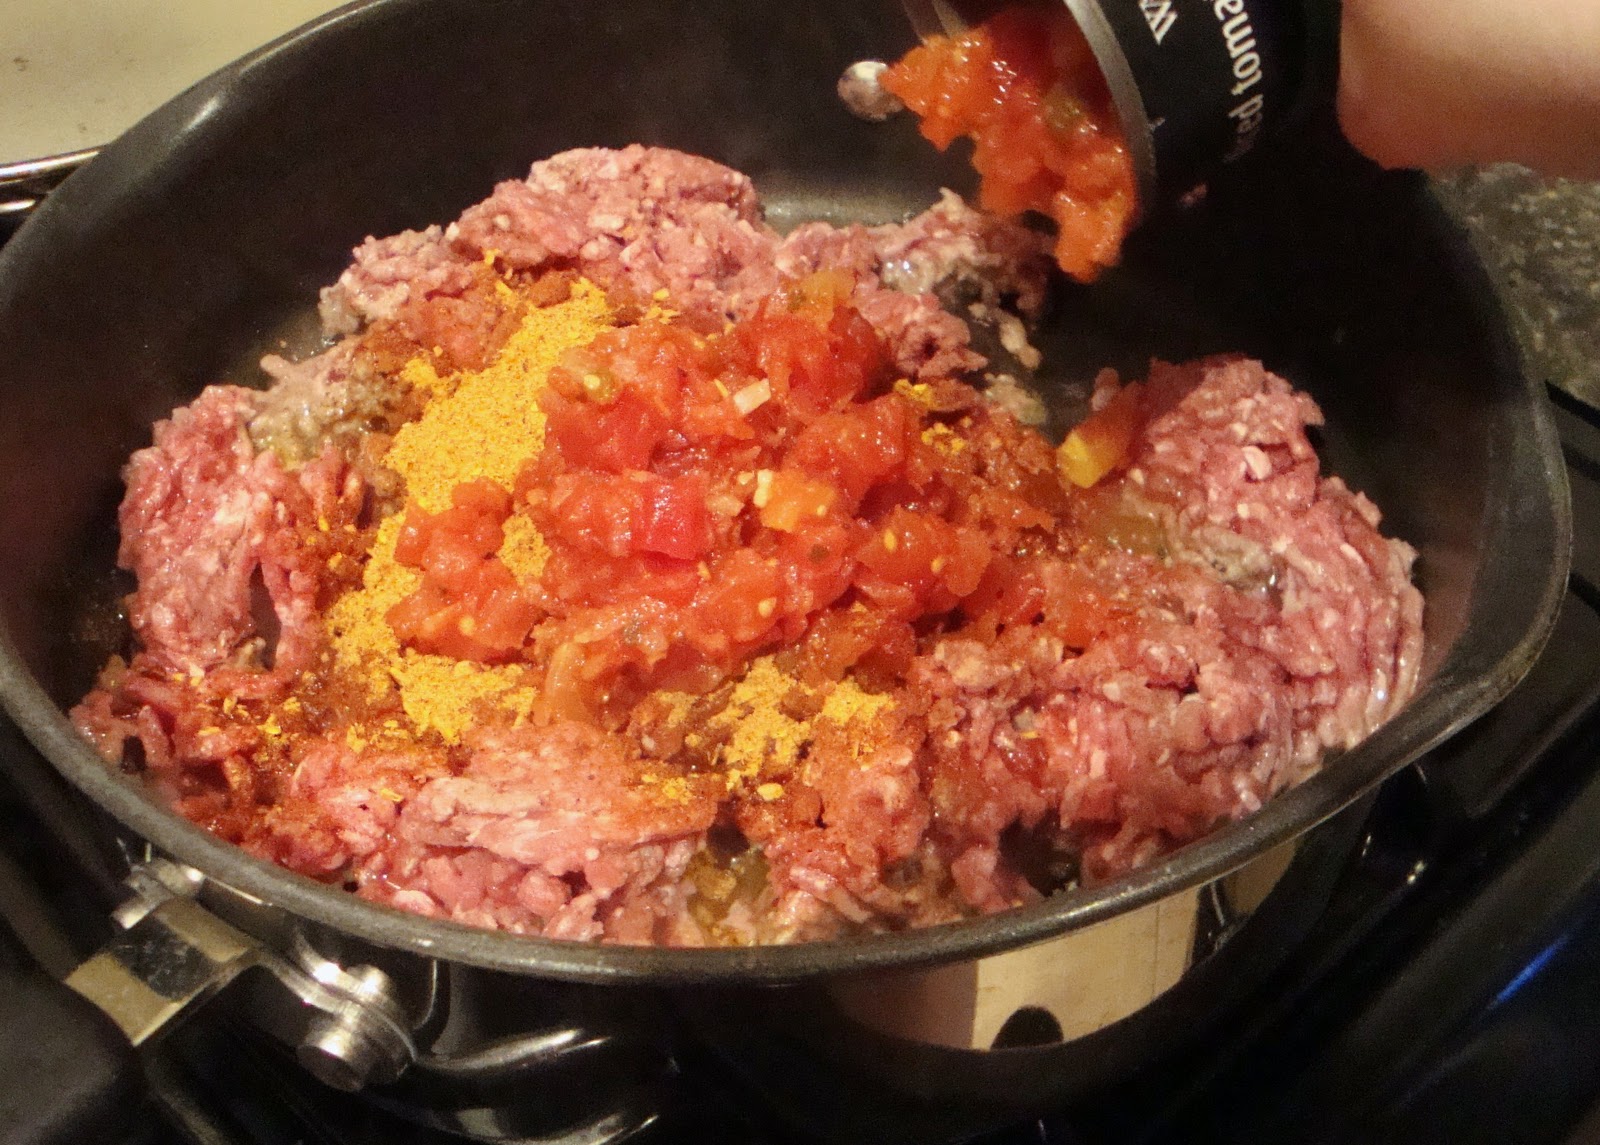
...and the tomatoes with green chilis. Mix this all together really well.


Cook until beef is browned & looks this delicious.

Yes, I could just stop here & eat this & be happy. But there is so much more to come that makes it even more tasty.


While your beef is browning you can go ahead & chop your green onions. Or you can wait until the meat is finished, set it aside & chop your onions. You will use about 4 green onions. You can do more or less depending on your taste.


Next, grab your baking dish. This one only fit 3 burritos so I had to add an extra dish for the other two. I'm sure you're much smarter than me & will just go ahead & start with one large baking dish. Whatever you use, I suggest spraying it with some non-stick spray. I didn't & my burritos stuck to the pan a little bit.

Spread about 2 Tbsp of the enchilada sauce in the bottom of your dish.


Now get your flour tortillas. You'll need to use the large-burrito sized ones.


Lay your tortilla out & spread about 2 Tbsp or so of refried beans over it. I didn't spread this right down the center, I kind of spread it to one side. This will help when you are rolling it up.


Then take a good spoonful or three of your ground beef mixture & spread that over the beans.


Now sprinkle your cheese over that. This part is entirely up to you, meaning you can put as much as you like. If I had to guess I would say I used a couple of heaping tablespoons.

Sprinkle a few of the green onions over the cheese.

Here comes the fun part.


On the short ends of your mixture you've spread over the tortilla in a somewhat rectangular shape, fold up the sides.

Then fold the shorter part over the those two ends. The short part being the side the rectangular bean/meat/cheese/onion formation is closer to.


Now roll that all the way over keeping the rolled over part tucked in as tight as you can & keeping the sides tucked in as well.


Roll it over one more time until it looks something like this.

I'm no tortilla rolling expert, but this was a pretty good attempt if I do say so myself. I cannot promise however, that the other four turned out as nicely as this one did. Just sayin'.


Place that nicely rolled up burrito in your baking dish & repeat the filling & rolling steps with your remaining burritos-to-be.


Pour the remaining enchilada sauce over the burritos. Be sure to cover each one as much as you can. I ended up using about a can & a half of the sauce, but again, it's entirely up to you & your taste buds.

Now sprinkle the tops with shredded cheese, again, as much as you like.


Dot the burritos with black olives.

Place them in the oven at 400 degrees & bake for about 20 minutes to get the inside as melty & delicious as the outside. You may choose to bake them a little longer or a little less, it's up to you.

When they are done they come out looking like this. There is one missing from this dish, they smelled & looked so delicious that the minute they came out of the oven I yelled "there done!!!" & my boyfriend immediately snagged one. I then realized I had not snapped the picture & the record stopped when I then yelled "crap!". So that's the story behind the missing burrito.


Garnish with sour cream & a few more green onions & serve.

Note: I know that I often say you can add or take away or basically do what you want with my recipes. That's because I want you to try them but I want you to adapt them to your taste. If your taste is the same as mine & you want to follow the directions to a tee, then please do so, I'm flattered that you might kinda wanna be like me. But if you change it up that's great. That's what cooking is all about experimenting & preparing delicious food & what is delicious to me may not be the same for you & vice versa. I just want us all to get along & cook good food.

Beef & Bean Burrito Enchiladas

1 1/2 lbs ground chuck
1 can diced tomatoes & green chilis
1 packet of taco seasoning
1 package of burrito (large) sized flour tortillas
4 green onions, sliced
1 can of refried beans
2 cups of shredded mexican blend cheese
2 cans of enchilada sauce
1 small can of sliced black olives
Sour cream to taste

Preheat your oven to 400 degrees.

Brown ground beef with taco seasoning & diced tomatoes until done. Set aside. Chop green onions. Spray a baking dish with non-stick spray & spread about 2 Tbsp of the enchilada sauce in the bottom of dish. Place one tortilla on your work surface. Spread 1-2 Tbsp of beans just off-center on tortilla. Layer 2-3 Tbsp of your beef mixture over beans, then sprinkle about 1 Tbsp of shredded cheese over beef & top with a few green onions. Fold & roll up tortilla (see instructions above). Place burrito in baking dish. Repeat layering of ingredients with each tortilla, rolling each & placing in baking dish. Once complete, pour remaining enchilada sauce over burritos being sure to cover as much of each burrito as you can. Sprinkle the tops with the shredded cheese & dot with black olives. Bake for 20-25 minutes. Serve with sour cream & garnish with remaining green onion.

Sunday, February 13, 2011

French Toast

Mmmmmm, french toast. We at the Gone With the Whisk household love french toast in general, but especially this french toast.

My boyfriends niece, who I might as well call my niece too, told me not so long ago that it was the best french toast she'd ever had.

And I believe her.

That's quite a compliment coming from her because she's 8 years old & 8 year olds know good french toast. Plus, this eight year old speaks her mind, no holds barred. She also told me, her dad & his girlfriend once that she knew why we liked to hang out with her...because she's a fun girl.

See, she knows what she's talking about. I love that kid!

Here's my french toast story. When I was a wee-little thing it was always a special treat to have french toast. I think it made me feel fancy. So when we would go out for breakfast I would usually order french toast...because I like to look fancy.

I remember one time in particular we took our first trip to Disney World, I was about 17 & my brother & I went with my dad & my stepmother. Our last full day there, the boys (my dad & brother) and the girls (me & my stepmom) went our separate ways. Us girls decided to go eat breakfast somewhere nice which happened to be a cute little restaurant in the Magic Kingdom. We looked over the menu & I immediately saw french toast & knew this was what I wanted. When it arrived at the table, it looked beautiful & delicious & all fancy with it's powdered sugar, strawberry slices & mint leaves. Ever since that moment every time I eat french toast whether it's in my pajamas from a paper plate, french toast sticks from Burger King or somewhere really nice, I think about that.

Okay, I've bored you enough with personal stories. I know all you're really interested in is what happened this time.

So here we go.

Oh wait! One more quick story. My boyfriend, the Hunk (my mother actually gave him that name) loves french toast too, it reminds him of his childhood as well. But he said it didn't make him feel fancy, he just liked it & still does.

Men...boys...gotta love their simplicity.

Okay, french toast here we come.

I use french bread for this. I find it holds up better to the soaking up of the eggs & milk. It also just taste really good & looks a little fancier, especially cut on the diagonal. In addition I also used eggs, milk, cinnamon, vanilla extract & just a pinch of salt. Sorry I forgot to include the pinch of salt in the picture.

The salt really makes a difference, trust me on this, I'm a professional. Well, okay, not quite, but almost. Okay, not even almost. Just trust me.


First, in a shallow dish, whisk your eggs fairly well.


Then add your milk, cinnamon, vanilla & salt & whisk some more.


Your mixture should look something like this. The cinnamon has a tendency to settle so I suggest whisking between bread dips.


Using a frying pan or skillet or griddle, whatever blows your skirt up, melt a good pat of butter over medium heat. While that is melting...

Take a slice of your bread & lay it in the egg & milk mixture, press it down a little to help soak up the liquid & move it around some to kind of get the sides coated.


Then flip it over & do the same press down, move it around thing again. Lift it out of the liquid mixture & let just a little of the egg & milk drain off, just so it doesn't drip too much when you...


 ...transfer it to the skillet. Repeat these steps with all, in this case, four slices of bread.

Brown each slice for about 2-3 mins.

Flip the bread over & brown the other side for 2-3 mins. Each side should be a golden brown.

I will admit that sometimes I get wrapped up in the pressing down, moving around & transferring to the skillet & forget to flip the slices I put in first. If you do that too it's okay, they'll be a little more brown but will taste just fine.

When you are done you have lovely, delicious french toast.

Garnish with your favorite syrup & a little powdered sugar if you like. Serve this to your honey on Valentine's Day morning for breakfast in bed.

French Toast

4 Slices French Bread, cut almost an inch thick & sliced on the diagnol
2 Eggs
1/2 cup of millk
1/2 tsp vanilla extract
1/4 tsp ground cinnamon
Pinch of salt

Melt a pat of butter in a skillet over medium-high heat. Whisk eggs in a shallow dish. Add milk, vanilla, cinnamon & salt whisking until well blended. Dredge one slice of bread in the egg mixture, being sure the bread is completely coated. Flip bread over & coat the other side. Remove bread from egg mixture allowing just a little of the liquid to drain from the bread. Place bread in skillet. Repeat the dredging with each slice of bread. Brown for 2-3 minutes on each side. Serve hot with syrup.


Wednesday, February 2, 2011

Apple Cobbler with Cinnamon-Vanilla Cream


OMG! She bakes!! I baked! Can you believe it?!?

I only baked because of the simplicity of this recipe. I was inspired one cool Sunday morning as I was paroozing through a couple of cookbooks & sipping my coffee. I saw a couple of different recipes
for cobbler & thought it sounded like just what I needed that day.

I decided to make individual sizes so that I wouldn't overindulge for the next three days because I made a cobbler large enough for a family of 8.

I also decided to make apple cobbler & this thing is chock-full of them. I know this may not be everyone's cobbler of choice but I love apple anything. Most people prefer peach or blueberry or blackberry, not me, I'm an apple girl.

So how do you make these delectable sweet treats you say? Simple, dice about 2 cups of granny smith apple. I don't peel the apples, but you can if you like.

Granny Smith is the best for making apple desserts, they hold up well to the cooking process & are tart enough to allow for the extra sweetness desserts have.


Toss the apple chunks with a 1 cup of sugar & a 1 cup of water. Bring the mixture to a boil & simmer for about 10 minutes, stirring often & making sure sugar is completely dissolved.

While your apples are simmering mix together a 1/2 cup of self-rising flour, 1/2 cup of milk, 1/2 cup of sugar & 4 Tbps of melted butter.

Whisk until well blended.

Spray a ramekin with non-stick spray (you can never be too careful about making sure things don't stick). My ramekins are about 4" in diameter & 2" deep. Pour your whisked batter into the ramekin.

Tap the full ramekin on the counter a little to help it settle & smooth out.


Once the apples are done simmering in the simple syrup (that would be the water & sugar mixture), pour them into the batter with most of the simple syrup distributing evenly between two ramekins.

Place in a larger baking pan & fill that pan with a little water. Sprinkle just a touch more of sugar on top.

And yes, before you ask that is a blueberry cobbler you see in the background. I made one for my boyfriend, The Hunk, using frozen blueberries. I don't care for blueberry anything.

I know I'm weird, it's the berry that makes the world go 'round & is everyone's favorite, except mine.

I'm not a fan.

I'm sorry.

Back to the apple cobbler.

You'll bake these at 350 degrees for about 30-45 minutes. I baked mine for around 35 minutes because it will continue to cook a little once it's removed from the oven. If you like your cobbler gooier then I suggest you only bake it for the 30 minutes.

When you remove the cobbler from the oven it will look something like this. Golden brown on top with a little crunch, sweet & delicious.

Now for the cream, this is even easier to fix, if that's possible...& it is.

For this recipe I used about a cup of prepared whipped cream or Kool Whip.

Add about a 1/2 teaspoon each of vanilla & cinnamon. 

Mix until well blended. See all the little flecks of cinnamon. This stuff is great on any dessert or straight off a spoon or your finger. The vanilla & cinnamon just add a little something special to regular 'ole whipped cream.

Place a dollop of the whipped cream on your apple cobbler while it's still warm...

...and watch the whole thing disappear. Mmmmmm, my mouth is watering again just thinking about how good this was.

Apple Cobbler with Cinnamon-Vanilla Cream

2 cups chopped Granny Smith apple
1 cup water
1 1/2 cups of sugar
4 Tbsp melted butter
1/2 cup self-rising flour
1/2 cup milk
1 cup whipped cream
1/2 tsp vanilla extract
1/2 tsp ground cinnamon

For Cobbler:
Preheat oven to 350 degrees.

Place apple chunks, 1 cup of sugar & water in small sauce pan. Bring to a boil, then lower heat & simmer for about 10 minutes. Meanwhile, whisk together remaining sugar, milk, flour & butter until well blended. Spray 2 small baking dishes with non-stick spray & distribute batter evenly between the two dishes. Do not stir. Tap dish on hard surface just enough to help it settle & smooth out. Pour fruit & most of simple syrup on top of batter, again distributing evenly between the two servings. Still do not stir, the batter will rise to the top while baking. Sprinkle each cobbler with a pinch of sugar. Bake for 30-45 minutes.

For Cinnamon-Vanilla Cream:
In a small bowl mix whipped cream, vanilla & cinnamon together until blended well.

Top cobbler with whipped cream & serve.

You can double all of the ingredients & prepare one large cobbler in about an 8x8 baking dish. The cooking time & temperature would remain the same as mentioned above. You can also make this with any fresh or frozen fruit you look, just clean, peel & core.